shopify app
Managing your blog with Builder empowers you to design and manage a robust blog in just a few simple steps. With Builder, you can mix content and commerce to upgrade stale static articles into exciting, shoppable posts.
In this tutorial, we will explore two scenarios:
You not only have the option of redesigning your current blog theme pages in Builder, but you can also write blog articles from scratch and publish straight from Builder!
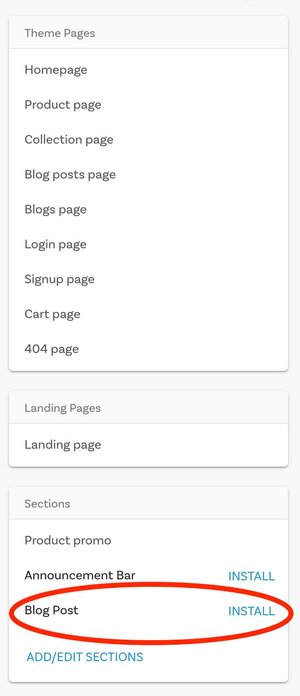
To start, select Install next to the Section titled Blog Post in the content list sidebar.

The section will be automatically created and ask you for a title for your first entry and take you to your Builder page to start working.
Navigate to the Options tab and you'll notice several input fields to add such as your blog article title, a thumbnail that will appear in your blogs page, etc. You can add and manage these metadata fields the same way you would in Shopify.
Now you can build out your page adding text, images, even dragging and dropping product boxes onto the page!
Once you've finished your blog article and are ready to publish, click the +Publish button in the top right corner of your page. Clicking publish will not only make the blog article live, it will add this blog article to your Shopify blog entries as well, which you can find in your Shopify Admin.
👉Tip: If you have multiple blogs, you'll want to verify the blog article is published in the correct blog page. Head to your Shopify Admin to view the blog article. You'll see which blog page it's currently sitting in (eg "News" in the image below). From the dropdown you can change the blog page and save if you want to move it.
You can also use Builder to edit the design of your theme pages. There are 2 theme pages you can edit for your blog:
- Blogs page: a page with all of your blog posts
- Blog posts page: an individual blog post entry
From either the studio tab or content tab, you'll see your theme pages on the left sidebar.
You can either select +Create to build out a new theme page or select +View all (if you've already created theme pages in Builder) if you want to view your current ones.
In this example, we're going to edit our template for the blogs page. Choose +Create, and you'll see the option to create a new blog article, a new blogs page, or an editable section to your blogs page.
Select +Create a new blogs page
Next select the first option, +This should display for everyone. If you'd like, you can always create content that is targeted for specific audiences. This can also be managed with the visual editor later. Read more about targeting here.
Before creating your blogs page, it will prompt you to choose one of our templates. This is a starting point for your blog, but you can completely customize the page and even change the design completely.
Any blogs page or blog post templates you've already created in Shopify will be previewable in Builder, so you can see your current content and start designing your theme pages!


