Private Cloud Connection
Private Cloud Connection lets your Builder Code environments securely reach resources inside your private network. This includes internal Git servers, package registries, staging databases, and internal APIs. Traffic does not travel over the public internet.
How it works
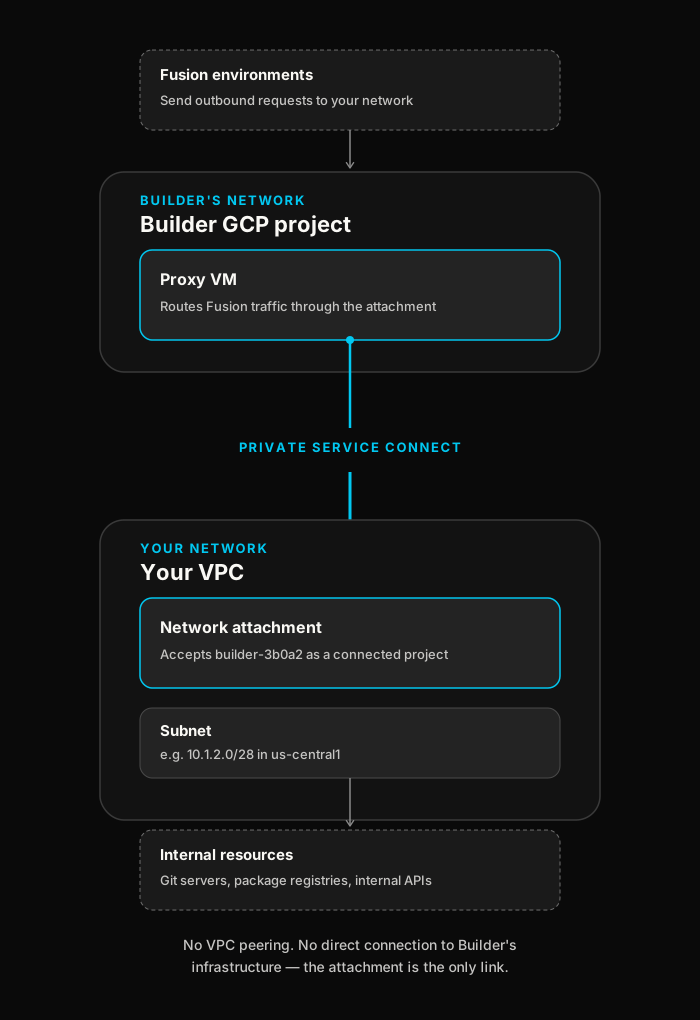
You create a network attachment in your VPC and allow Builder's GCP project to connect to it. Builder's proxy VM connects through that attachment and routes your Builder Code environments' traffic into your network.
From your network's point of view, this traffic originates from a standard IP address inside your own subnet. Your existing firewall rules apply without modification. There is no VPC peering and no direct connection to Builder's infrastructure. The network attachment is the only link between the two networks. You control which projects can use it.
Prerequisites
Before you begin, ensure you have access to the following:
- The Google Cloud project that contains the VPC you want to connect.
- The
compute.networkAttachments.createIAM permission, included inroles/compute.networkAdminorroles/editor. - A subnet in
us-central1within that VPC, or the ability to create one. The network attachment must be inus-central1to match Builder's proxy region.
Establish your connection
Follow the steps below to establish a connection.
Step 1: create a subnet
If you do not already have a subnet in us-central1, create one. A /28 subnet provides 16 IP addresses. This range is sufficient because the network attachment only requires a small number of addresses to establish the proxy connection.
Step 2: create the network attachment
This step authorizes Builder's project to connect to your subnet. Builder's project ID is builder-3b0a2.
gcloud CLI
GCP console
To create the network attachment through the GCP Console:
- Open Network Attachments > Create in the GCP Console.
- Enter a name such as
builder-connection. - Set Region to
us-central1. Select your VPC and subnet. - Under Connection preference, choose Accept connections for selected projects.
- Add
builder-3b0a2as an accepted project. - Click Create.
Step 3: enter details into Builder
Open Private Cloud Connection in your Builder space settings and fill in:
| FIeld | Value | Required? |
GCP Project ID | The ID of the GCP project that contains your VPC and network attachment. For example, | Yes |
Network attachment name | The name of the network attachment you create in | Yes |
Customer DNS servers | IP addresses of your internal DNS resolvers. one per line or comma-separated. Leave empty to use public DNS. | No |
Once you are done, click Save.
Step 4: confirm the connection
Click Check status.
Builder verifies the attachment exists, confirms its project is accepted, and confirms the proxy VM is connected. After the status is confirmed as healthy, new Builder Code environments route through the connection automatically.

If the check fails, confirm that builder-3b0a2 is on your attachment's accept list. Confirm that the project ID and attachment name match exactly.

DNS resolution
By default, Builder Code resolves hostnames using public DNS. This is sufficient if your resources are public or if you connect to them by IP address. To resolve private hostnames, add your internal DNS resolver IP addresses in Customer DNS servers. An example of a private hostname is git.corp.example.com.
Builder forwards DNS queries to those resolvers through the network attachment. Confirm that your resolvers are reachable from the subnet created in Step 1. Confirm that your firewall allows DNS traffic on UDP and TCP port 53 from that subnet.
If your private hostnames use Google Cloud DNS private zones instead of a resolver IP address, leave this field blank. Contact your Builder account team, since private zones require additional setup.
Firewall considerations
Traffic from Builder Code appears to originate from an IP address in your subnet. Confirm that your firewall allows that subnet to reach the required resources.
| Resource | Port | Notes |
Git server | TCP 443 | HTTPS clones and API calls |
Git server | TCP 22 | SSH, if your team uses SSH URLs |
Package registry | TCP 443 | For installing dependencies |
Internal APIs | TCP 443 or TCP 80 | As required by your applications |
DNS servers | UDP and TCP 53 | Only if using custom DNS |
Scope firewall rules to the subnet CIDR, not to a single IP address. For example, use 10.1.2.0/28. The proxy VM's IP address can change during maintenance.
Solve common issues
- Check status fails immediately after saving. Confirm that
builder-3b0a2is accepted. Confirm that the project ID and attachment name match exactly. - Builder Code cannot resolve an internal hostname. Confirm that your DNS resolver IP addresses are entered correctly. Confirm that they are reachable. Confirm that your firewall allows port 53 from your subnet.
- The hostname resolves but the connection fails. This is usually caused by a firewall rule. Allow traffic from the subnet to the target resource on the required port.
Revoke access
To revoke access, remove builder-3b0a2 from your attachment's accepted projects. Notify your Builder account team so they can decommission the connection.
AWS PrivateLink
If your private resources run in AWS, connect them with AWS PrivateLink instead of a GCP network attachment. You expose an internal service through a VPC endpoint service that allowlists Builder's AWS account, then Builder creates a matching interface endpoint to reach it. Traffic stays on the AWS and Google private backbones and never travels over the public internet.
How it works
You create a Network Load Balancer and a VPC endpoint service in your AWS account, and add Builder's AWS account to the endpoint service's allowlist. You paste the generated endpoint service name into Builder, along with the private hostnames and ports Builder Code should reach.
Builder provisions an interface VPC endpoint on its side and connects it to your service. Because the service requires acceptance, you approve that connection in AWS. Builder Code then reaches your service privately through the endpoint.
Your endpoint service can run in any AWS commercial Region. Builder's interface endpoints run in us-east-1. If your service is in a different Region, Builder reaches it with cross-region PrivateLink, so you don't need to deploy anything in us-east-1.
PrivateLink exposes only the specific services you put behind the endpoint service, not your whole VPC. Each service you want Builder Code to reach is one endpoint entry in Builder.
Prerequisites
Before you begin, ensure you have the following:
- An AWS account with permission to create a Network Load Balancer and a VPC endpoint service, for example the
AmazonVPCFullAccesspolicy or equivalent EC2 and Elastic Load Balancing permissions. - The internal service or services you want Builder Code to reach, each addressable by a target the load balancer can forward to, such as instances, IP addresses, or an existing target group.
- Your endpoint service can be in any AWS commercial Region. All endpoints in one connection must be in the same Region.
- If your service isn't in
us-east-1, the principal that configures the endpoint service also needs thevpce:AllowMultiRegionpermission. AWS requires this permission-only action to enable cross-region access. - If your service is in an opt-in Region, one that AWS doesn't enable by default, contact your Builder account team before you begin.
Step 1: create a Network Load Balancer
Create an internal Network Load Balancer in the Region where your service runs, with a target group and listener for each port your service exposes. Point the target group at your internal service. For a cross-region connection, the load balancer must span at least 2 Availability Zones.
Step 2: create a VPC endpoint service
Create a VPC endpoint service in front of the load balancer, require acceptance, and add Builder's AWS account to the allowlist so only Builder can connect. Builder's AWS account principal is arn:aws:iam::597437435687:root.
If your service isn't in us-east-1, also add us-east-1 to the service's supported Regions. This lets Builder's endpoint in us-east-1 connect to your service.
AWS CLI
AWS console
To create the endpoint service through the AWS Console:
- In the Region where your service runs, open VPC > Endpoint services > Create endpoint service.
- Select your internal Network Load Balancer.
- Enable Acceptance required.
- If your service isn't in
us-east-1, add US East (N. Virginia) under Supported Regions. - Create the service, then open it and under Allow principals add
arn:aws:iam::597437435687:root. - Copy the Service name. It looks like
com.amazonaws.vpce.eu-west-1.vpce-svc-0123456789abcdef0, whereeu-west-1is your service's Region.
Step 3: enter details into Builder
Open Private Cloud Connection in your Builder space settings. Set Connection type to AWS PrivateLink, then add an endpoint with:
| Field | Value | Required? |
Endpoint service name | The service name from Step 2, for example | Yes |
Hostnames | The private hostnames Builder Code should resolve to this service, one per line or comma-separated. For example, | Yes |
Ports | The ports your service exposes, comma-separated. For example, | Yes |
Add more endpoints for additional services, up to 10 per connection. Once you are done, click Save.
AWS PrivateLink connections do not use the Customer DNS servers field. Builder resolves the hostnames you list here directly to the matching endpoint.
Step 4: accept the connection and confirm
After you save, Builder creates an interface endpoint that connects to your endpoint service. Because the service requires acceptance, the connection starts as pending in your AWS account. Accept it to activate the link.
Back in Builder, click Check status to review the configured endpoints. Once the connection is active, new Builder Code environments route to your service automatically.
Endpoint status may show as unknown in Builder even when the link is healthy. Builder has no credentials to query your AWS account, so it reports what you configured rather than live AWS state. Confirm the connection is Available in your AWS console.
Firewall and security groups
PrivateLink traffic reaches your service through the load balancer. Confirm that your target group's security groups allow traffic from the load balancer on each service port, and that health checks pass. Only the ports you list on an endpoint are reachable.
Solve common issues
- Save fails with a region or format error. The endpoint service name must be in the form
com.amazonaws.vpce., and every endpoint in one connection must use the same Region..vpce-svc-xxxxxxxxxxxxxxxxx - A cross-region connection never shows as pending. Confirm that
us-east-1is in your endpoint service's supported Regions and its state there is Available. A newly added Region can take a few minutes to become available. - The connection stays pending. Accept the endpoint connection in your AWS account, as described in Step 4. Builder cannot accept it for you.
- Builder Code cannot reach the service. Confirm the load balancer target group is healthy and its security groups allow the endpoint traffic on the listed ports.
- Builder cannot connect after acceptance. Confirm you allowlisted
arn:aws:iam::597437435687:rootand that the hostnames and ports in Builder match the service.
Revoke access
To revoke access, remove arn:aws:iam::597437435687:root from your endpoint service's allowed principals, or delete the endpoint service. Remove the endpoint in Builder as well, and notify your Builder account team so the interface endpoint can be decommissioned.
For a cross-region connection, removing us-east-1 from your supported Regions only blocks new endpoints. Reject the existing endpoint connection to cut off access immediately.


