4 Approaches to Visual Editing with a Headless CMS, Compared
A major challenge of a typical headless CMS is that it lacks a visual way to find and edit content. This can cause challenges around:
- Knowing where to find what you need
- Knowing what the end result of your edits will look like
- Being able to make non-trivial changes without requiring engineering tickets and deploys
If you want to use visual editing with a headless CMS, it’s important to know there are a few different types of workflows available to you. They are:
- Visual edit buttons
- Visual live preview
- Visual component composition (that is, "drag & drop" editing)
- Visual no-code editing
In this article we will break down the four types, what the impact on your code and workflow is for each, and when to consider using which.
This is the least “visual” of all approaches, but the simplest to adopt. It can require little to no integration — simply use Vercel’s new visual editor with supported CMSs, or use Builder.io’s Chrome extension, and you are up and going.
This offers a way to hover over content on your live site and be prompted with a button to jump right into your visual CMS to edit it.
Any typical CMS integration will support this, to pull structured fields from a backend and then render them as you choose:
This approach, while limited in actual visual editing, can be great for easily adopting and testing the waters of visual editing with a headless CMS, and can particularly help with locating content you need right from your live website.
Advantages
- No special integration required
- Finding content to edit
Limitations
- Non-trivial edits (you are still limited to what fields are defined, larger changes require engineering tickets and deploys)
- Site can be broken during live previewing
Ideal for
- Structured data such as blog authors, product details, navigation links
Not ideal for
- Pages, page sections, promotions, or other areas that need frequent iteration on composition, layout, and/or style
The next level up for visual editing is rendering a live preview of your edits as you make them. This can really help with ensuring that your content looks as you expect in a natural and intuitive way.
Code for this can vary by CMS, but can be as basic as wrapping the content you render in a simple layer that can intercept messages from a CMS editor and display updates in real time, like below:
This approach still operates broadly like any headless CMS does - you create a structured data schema and manually wire up how it renders.
It is useful for when you need a specific structure to your data, but can have drawbacks if you need your editors to make non trivial changes to content (like to add, remove, or rearrange significant portions) without engineering tickets and deploys.
Advantages
- Structured data that benefits from a preview of changes in real time. This can be things such as product details, blog and authors.
Limitations
- Allowing non-trivial visual editing, for instance for page building, promotional sections, and other things that need iteration without engineering tickets and deploys.
Ideal for
- Structured data such as blog authors, product details, navigation links.
Not ideal for
- Pages, page sections, promotions, or other areas that need frequent iteration on composition, layout, and/or style.
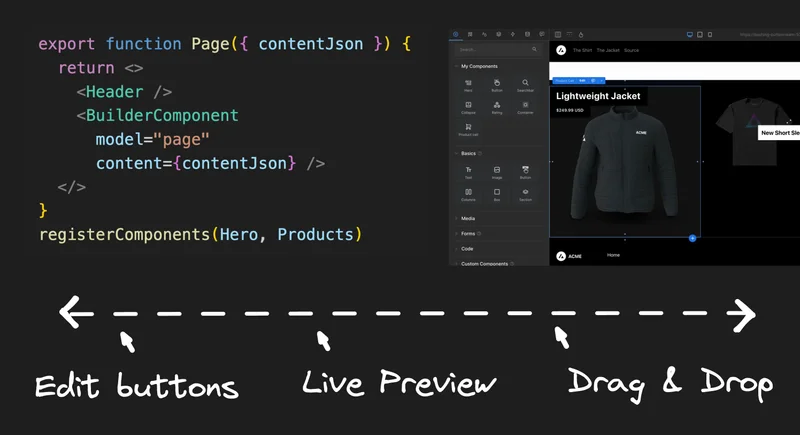
This is where we get deeper into the most commonly accepted meaning of "visual editing" — that is, where we can actually drag & drop to build and edit content.
Here, the typical headless CMS structure of hard coding layouts connected to tabular fields is flipped, and instead developers solely build components, each with their own specific inputs (or “props”).
These components can then be endlessly reused to make new things across your site, without engineering tickets and deploys for every small change.
As for how this impacts your code, instead of hardcoding full pages and layouts and manually building sets of fields to connect them to, we instead just specify in our code what components are available and their inputs.
Now editors can make infinite combinations of them without more code changes, schemas, or deploys.
Above, we show visually creating an entire page, but this works for sections of pages as well:
The code for that is similar, with a couple small differences. Generally, you create a model for different types of sections, and query or target them to the correct placements and audiences.
Advantages
- Keeps your code and development component-driven.
- Endlessly repurpose components without code changes and deploys.
- No engineering tickets needed for most common use cases.
Limitations
- Still requires code updates if a component change is needed.
- Anything net new needs a new component.
- Not best for purely structured data, like navigation links or blog authors.
Ideal for
- Pages, page sections, promotions, or other areas that need frequent iteration on composition.
- Visual content (pages and sections) that need perfect consistency with the rest of the app or site.
Not ideal for
- Structured data such as blog authors, product details, navigation links.
- Pages or sections that are best not restricted to existing design systems, such as landing pages and limited time promotions.
The most visual option on our list is complete no-code editing, similar to what many site and page builders offer, such as Webflow.
With this form of editing, you don't need an entire system of components built to support all use cases, but you can instead produce whatever you need purely visually.
This method has the most basic integration, and requires the fewest engineering tickets, code updates, and deploys over time:
Similarly, this can be used for full pages or just sections of pages at a time, and be combined with custom fields to allow structured data in combination with component composition.
Advantages
- Make changes as needed without engineering tickets and deploys.
- Greater flexibility to experiment, especially useful for A/B testing and personalization.
- AI generation of content
- Import designs from Figma in a click
Limitations
- Doesn't strictly require consistency with your design system, though this can be controlled with roles and permissions.
- Not the best suited for data that requires a rigid structure, like navigation links, product details, or blog authors.
Ideal for
- Pages or page sections, or other areas that need frequent iteration on composition
- Landing pages and promotions that need unique styling
- Blog articles (like this one, which is made with visual editing!).
- UIs that may not perfectly exist in your codebase or design system yet.
Not ideal for
- Structured data such as blog authors, product details, navigation links.
At the end of the day, the best thing to do is to combine techniques to use the right technique for the job.
As an example of combining techniques, part of your site might you may want your homepage to stick to your design system using pure component composition.
Then your blog or landing pages you may allow full no-code editing to create rich and unique content. But use structured data to manage the blog authors and tags.

For sections of other pages, you might choose to offer rigid structured data with a live preview, or more flexible component composition within a given area, or full no-code flexibility for the most creative freedom (such as for promotional areas).
You can learn more about when to use which method, and how best to combine them, in our in depth video:
Also note that the mode you choose doesn't have to vary by content type, but can also vary by roles and permissions.
So even within the same piece of content, editors may be confined to a design system, but designs may be allowed to generate net-new designs as needed with no-code.
One important thing to note about all of these visual editing methods in the context of a headless CMS is that each builds upon the next.
So for example, in Builder.io, all content that supports live previews supports edit buttons. All content that supports component composition supports live preview. And all content that supports no-code editing also supports component composition.

This unlocks a lot of power. For instance, in this blog post we have structured fields with a live preview for the title, blurb, handle, and other info used both in the layout and for SEO and meta information that is handled directly in code.
Then, we can use no-code editing to create any format of text and imagery we like; for example, our images and videos can have any unique styling.
Then for code snippets and headings, we have custom components that we use visually to add UI/UX improvements such as printing the code with nice formatting and making the article headings linkable.
The real power is in combining technique, which is how we made this blog post:
We’ve recently created the Builder.io Playground to allow you to try out the code and integration for a few of the above types of editing:
Or just create a free account to try them all on your real, live site to see what works best for your use case.
Or, you can talk to an expert on our team to assess your needs and recommend the best approach for you.