You spot a tiny UI issue on production. Fixing it in Figma takes 30 seconds, but shipping the code takes days of handoff, review cycles, and back-and-forth about design tokens.
Claude Code can help you move faster. It's an agent that can open your repo, read files, make edits, and preview your app—all from a workflow that's increasingly approachable for non-engineers.
Pair it with Figma MCP, and Claude pulls structured design context directly from your files to generate code that actually matches your frames.
Here's how to get started, some useful workflows, and where to turn if the workflow gets too complex or tough to maintain.
What designers want from an AI coding agent is a workflow that respects their role.
- Faster time-to-iteration: design intent to real UI (not another mock)
- Higher fidelity: correct tokens, spacing, components, and states
- Less translation overhead: fewer "what did you mean by this?" loops with PMs and engineers
- Less context-hopping: a workflow that doesn't sprawl across windows
- Visual-first tooling: an interface that feels natural for design work
- A safe lane to contribute: clear review, guardrails, and undo paths
- A shareable artifact: previews and a PR devs can review, without designers needing to make write-ups
Claude Code can help with much of this, but not all of it. It excels at delivering faster time-to-iteration, higher fidelity, and less translation overhead. And once you learn about Git workflows, you can easily use Claude Code to make a shareable artifact of your changes that developers can directly see, edit, and implement into the codebase.
However, Claude Code doesn't really help with less context-hopping, visual-first tooling, or giving you a safe lane to contribute. Using an AI coding agent means stepping directly into the engineering environment, which can be intimidating. I know your goal isn't to become a part-time developer, and you definitely don't want the anxiety of breaking production code.
That's why I'm going to show you a safe, straightforward way to use Claude Code. For the areas where it still falls short, I'll share an alternate workflow at the end of the article.
Claude Code is an AI assistant that actually does the work: instead of you trying to write code and asking an AI to fix it, you describe what you want in plain English. The agent then explores your files, plans an approach, and makes the updates for you—all with safety guardrails in place.
For designers, the easiest way to start is the Claude Desktop app. It keeps you out of the command line (that intimidating black window with scrolling text) and gives you a friendly visual interface. The app's Code tab provides:
- App preview: Claude Code Desktop can spin up your local development server and show you a preview of your app right in its own interface. You can see all your design changes live.
- Permission modes: Control how much the AI is allowed to do on its own.
- Safe multitasking: Explore multiple design ideas at once without them tangling together.
- Tool connections: Hook it up to tools your team already uses, like GitHub, Slack, or Linear. (And Figma, of course! More on that below.)
- Integrated code review: While you don't need to read the code, Claude Code can automatically check the code it writes for bugs and logical issues before you hand it off.
- Built-in safety: Start in "Plan mode" so the AI can only propose changes, not make them. That single habit gets you 80% of the safety you want.
Note: You must have a paid Claude plan to even see the Code tab in the Claude Desktop app.

In practice, the scariest part of contributing to code isn't writing the actual JSX or CSS. It's the initial setup.
Before you can even change a hex code, you're faced with an annoying one-time IT setup: installing dependencies, finding missing environment variables, and wrestling with internal tooling. It feels like you're one wrong click away from taking down the company website.
Traditionally, this meant staring at a terminal window screaming at you in red text over a missing comma. But because you're using the Claude Desktop app, you don't even need to look at the command line. Claude handles the underlying terminal commands, acting like a patient IT support buddy navigating the setup for you.
The fastest way to get over the fear of breaking things is to understand what a local repository actually is. Think of cloning a repo as duplicating a Figma file. You are downloading a sandbox copy to play with on your own machine.
If you mess it up, the worst case is usually:
- Delete the folder
- Re-clone the repo
- Try again
You are not breaking production. If you completely destroy a layout locally, you haven't touched the original source truth. And even when you are ready to share your work, your team's normal code review process is what actually protects the live site.
All that said, let's jump into your first design changes with Claude Code.
This walkthrough is designed to produce a small, shippable result without requiring you to ever open a terminal or look at scary error logs.
We're letting Claude Code do all the heavy lifting.

Instead of trying to figure out git clone commands, you can just ask Claude to grab the code for you:
Please clone the repository from [insert GitHub URL here] into my [insert parent folder here] folder.
Claude will handle downloading the code to your machine. The code will always be placed in a new folder matching the repository name.
Now that you have the code, you need to see it. Designers often get stuck on installing dependencies and starting the local server. Let's make Claude do it:
Prompt: Get local dev working.
That's it. Claude will analyze the repo, figure out the framework, and install the right dependencies.
Here's the catch: Claude Code will ask you for permission to run commands—a lot of them. You'll see prompts like "Can I run npm install?" This is normal.
For standard repo setup commands, you can click Always Allow to speed things up. (Obviously, if it asks to install a virus, hit no. But for normal dependencies, you're fine.)
This permission babysitting is just part of using Claude Code at first. Once you've approved the common commands, it gets much smoother.
Sometimes, Claude will try to start the server and get an error. If Claude says something about a missing .env file, missing environment variables, or authentication failing—don't panic. You did not break anything.
For security reasons, companies do not store secret passwords or API keys in the code repository. This means your local copy is missing the keys needed to talk to the database or external services.
Claude can't fix this for you because it doesn't know the passwords. You have to ask an engineer.
What to Slack your engineering team:
Hey! I'm trying to spin up [repo name] locally to test some design tweaks. Can someone securely send me the .env file I need to get the dev server running?
Once they send you the file (save it to your Downloads folder), do not paste the passwords directly into Claude. You don't want to leak company secrets into an AI chat log.
Instead, just tell Claude where you saved the file:
I downloaded the .env file to my Downloads folder. Please move it to the correct location in this repository and try starting the server again.
Even though the local server is running, you still can't see the app yet.
To actually see the site, look for the big Preview button in the top right of the Claude app. Click it. Claude will run a one-time setup (which usually includes adding a launch configuration file to your repo).
Here is where it gets tricky: Sometimes, the preview feature works perfectly on the first try. Often, it doesn't. Claude might ask you questions like: "Do you want to run the dev server or the preview server?" or "Which port should I use?"
Remember that you are talking to a smart AI, not a strict form. You don't have to know the answers. Just keep telling it what you do and don't know:
- "I don't know the difference between those options. Please just pick the one that lets me see the site."
- "I still can't see the preview. Here is a screenshot of what I see."
- "The preview is showing an error about a missing port. Can you fix it?"
Keep pushing back. Eventually, Claude will figure out the right configuration and you will be looking at a preview of your app right in the interface.

 The fallback plan: The in-app preview feature is new and, in my experience, can still be a little buggy. If you've gone back and forth with Claude and the preview still isn't loading, don't sweat it.
Just tell Claude:
Let's skip the in-app preview. Please just start the local dev server and give me the localhost link so I can open it in my regular browser.
Click the link it gives you (usually something like http://localhost:3000), and you'll see your site running perfectly fine in Chrome or Safari. This is being served from your local files—not the internet.
With any luck, you should now see your site running. The good news is you won't have to do all that setup again for this codebase, as long as the devs don't change anything with the code.
Before you redesign the entire navigation bar, get a quick win.
Good first tasks:
- Fix padding/margins on a single component
- Align a button style to a token
- Fix a hover/focus state
- Update a small layout issue in an existing page
Avoid for your first try:
- New architecture
- Big refactors
- Changes that span across the whole app
Now, describe what you want changed using plain English, just like you would in a comment on a Figma frame to another designer:
Let's make a small visual update to [describe the component, e.g., the primary button on the homepage].
Please change the background color to [hex code or token name] and increase the horizontal padding slightly.
Make this change with the smallest code diff possible. Prefer using our existing design tokens/variables if they exist.
Because you have the live preview open, the moment Claude finishes writing the code, the UI will update instantly.
If it looks wrong, simply reply: "That padding looks a bit too wide, can you reduce it?" and Claude will adjust the code immediately. You are iterating on real code exactly like you would on a Figma canvas.
Right now, you're describing design changes to Claude using plain English. That works, but Claude is still guessing what your button should look like based on the words you give it. It doesn't know your exact spacing, your design tokens, or your component library.
The Figma integration fixes that.
When you paste a screenshot into Claude, it sees a flat image. It can't see the spacing between elements, the design tokens you painstakingly set up, or which components are reusable.
So Claude ends up generating code with hardcoded colors (#3B82F6 instead of var(--color-primary)) and one-off layout rules instead of using your design system.
Instead of looking at a screenshot, Claude can now see:
- The actual layers and auto-layout rules in your Figma frame
- Your design tokens and variables
- Component mappings (if your team uses Code Connect)
This means Claude generates code that actually uses your button component instead of building a new one from scratch every time.
Claude has a visual interface for adding integrations:
- In the Claude Desktop chat box, click the plus icon (+)
- Select Connectors, then click Manage Connectors
- In the menu that pops up, click Browse Connectors
- Search for "Figma" and click to add it
- Claude will bounce you to your browser to authorize your Figma account
That's it. Claude and Figma are now connected.
The easiest way to use the Figma integration is with links.
Here's the workflow:
- In Figma: Right-click on the frame you want to build and select "Copy link"
- In Claude Code: Paste this prompt:
Build the component in this Figma frame: [paste link here]
- Reuse existing components if possible
- Use design tokens/variables instead of hardcoded values
- Keep the diff minimal
Claude will pull the structured design data from Figma, see your spacing/tokens/components, and generate code that actually fits your system.
Your mileage may vary. Heavily. Agentic workflows are, if you haven't already noticed, very finnicky. The key is to keep iterating.
Here's the cool part. If a dev built a page that isn't in Figma yet, you can capture a functioning UI built with Claude Code and convert it into a fully editable Figma frame. Not a screenshot. A real, editable design artifact.
However, there's a catch. While the standard Figma connector we set up above is point-and-click, the "Code to Canvas" reverse workflow requires a local Figma MCP server running on your machine.
This means using the terminal, running the Figma Desktop app in developer mode, and doing some more engineering setup. It's not quite as designer-friendly yet.
If you're comfortable opening the terminal and want to try it out, check out our step-by-step guide on how to set up Claude Code to Figma.
You've connected Figma, prompted Claude, and now you have a beautifully updated UI running on your local server. It's magic.
But you aren't working in a silo. How do you actually get this change to your developers? And conversely, how do you update your local app when the devs ship new code?
This is where the agentic illusion breaks down and the reality of software engineering sets in.
Because Claude Code operates directly in your local repository, you have to manage version control (Git). To share your work, you have to ask Claude to run git commit and git push, and then figure out how to open a Pull Request (PR) in GitHub so your engineers can review it.
Worse, what happens when an engineer merges new code into the codebase while you were working?
You have to pull those changes down to your local machine (git pull origin main). If they edited the same file you did, you'll hit a merge conflict, where your code and their code collide, and you need to resolve it manually.
Claude Code Desktop makes the whole experience more approachable (just keep asking for help), but it doesn't magically remove company repo complexity, authentication, or the tribal knowledge required to manage a local Git environment.

Claude can help you debug merge conflicts and commit issues, but you're still fundamentally playing the role of a junior developer managing a local repository.
So yes—Claude Code is cool. But the environment drift and manual syncing are still the boss fight for designers just trying to ship a visual tweak.
Not to mention that every time you want to work in a new repo, you have to do it all over again.
If Claude Code is an agent living in your computer with Git, Builder is a shared workspace connected directly to your team's repository.
It makes a fundamentally different tradeoff: instead of forcing every designer to become a part-time developer managing local environments, it moves the iteration and syncing into the cloud.
Here is what that workflow looks like:
- Devs set it up once. An engineer connects the repo to Builder, setting up the dev server commands, environment variables, and branch logic one time.
- Designers just click "New Branch." You enter the workspace without opening a terminal, configuring an
.envfile, or worrying aboutgit pull origin main. - You edit visually or with AI. Builder gives you a workspace with Design, Interact, and Code modes. In Design mode, you can literally just click on a component, move it around or edit its padding, color, or text visually, and hit Apply Visual Changes. The workspace automatically syncs those edits into the underlying code.
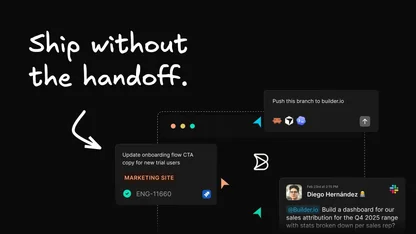
- The Magic Button. When you're ready to share your changes, you click Send PR. Builder handles all the Git complexity and creates a pull request in GitHub containing just the changed code, exactly in the format your devs need to see.
- The Guardrails. If your team prefers a stricter workflow, they can actually restrict the "Send PR" button for designers entirely. Instead, you click Review, select the team that needs to see it, and Builder automatically assigns it to the right person in the background to review and move it along.
No terminal. No merge conflicts. No asking an engineer for missing passwords.
And because you are handing off a reviewable PR (or an auto-assigned Review request) instead of a Figma link, you're speaking the exact language your engineers already use. It moves governance beyond just Figma.
Then the real collaboration loop kicks in: you can share preview URLs directly with stakeholders so they can click around the real UI before anything is merged.
For many teams, Builder and Figma are side-by-side tools: Figma for net-new design (0-to-1) and exploration, Builder for faster web iteration and shipping—without sacrificing import fidelity or round-tripping.
If you prefer to start in Figma, Builder's plugin supports exporting frames and pasting them directly into a Builder Project prompt. You can even export from Builder back to Figma if you want to update your design files after iterating in code.
If your design work starts with "this part of production looks wrong," Builder's Chrome extension includes a Copy Layout workflow that pulls real UI from any webpage directly into Figma. You can pull the UI into Figma quickly, redesign it, and then implement it in Builder.
So, which tool should you use? It comes down to what you are trying to accomplish and how much friction your team is willing to tolerate.
Start in Figma when:
- You are exploring net-new flows and completely new architecture.
- You need wide collaboration on a blank canvas.
- You are doing discovery and iteration before implementation.
Use Claude Code (with Figma MCP) when:
- You want an AI agent specifically inside your local repo.
- You are comfortable running terminal commands, managing Git, and learning local dev step-by-step.
- You need deep custom configuration, unique to you.
Use Builder when:
- You want to eliminate repo setup friction and environment drift for non-engineers.
- Your team wants a shared cloud environment with live previews and automated PR workflows.
- You are iterating on an existing web experience and want to visually edit UI without bouncing between tools.
- You want built-in Figma import and round-tripping.
Claude Code is a genuinely powerful tool that redefines what a designer can accomplish in code. Paired with Figma MCP, it transforms the messy "screenshot, prompt, and pray" translation cycle into high-fidelity code generation directly from your source of truth.
But the real challenge of cross-functional collaboration hasn't changed.
If you are a designer, managing repository drift, tracking environment variables, and resolving Git merge conflicts is a massive startup tax that distracts you from your actual work: designing and shipping great product experiences.
That's where Builder's shared cloud workspace changes the equation.
Instead of forcing every member of your team to become a part-time junior developer fighting a local terminal, you can just click a button, visually edit the real UI, and generate a clean PR.
Claude Code helps you go from design intent to implementation. Builder gives your whole team the shared infrastructure to make that workflow repeatable, safe, and wildly fast—without ever leaving Figma behind.