Setting Up a New Claude Code Project: The Complete Guide
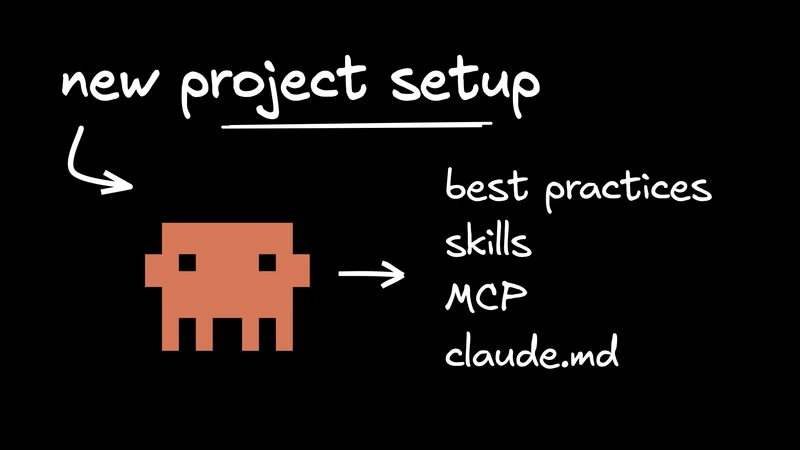
Most Claude Code setup guides still tell you to run npm install. That method is deprecated. The native installer requires no Node.js at all, and the real setup work starts after installation. Configuring CLAUDE.md, skills, and MCP servers turns a generic AI assistant into one that knows your codebase.
I've been using Claude Code daily for months. The difference between a default setup and a properly configured one is night and day. With a good CLAUDE.md and a couple of MCP servers, Claude stops guessing about your project and starts giving answers that fit your codebase. That setup takes 15-20 minutes. This claude code tutorial covers installation through your first productive session.
If you're getting started with Claude Code for the first time, start with our complete guide to Claude Code for the big picture.
Install Claude Code using the native installer. Run curl -fsSL <https://claude.ai/install.sh> | bash on macOS or Linux, or irm <https://claude.ai/install.ps1> | iex on Windows PowerShell. The npm method is deprecated and no longer recommended. No Node.js is required. After installing, run claude --version to verify, then launch claude in any project directory to authenticate. The official setup docs cover platform-specific details.
The install process takes about two minutes on any platform:
- Run the native installer for your OS:
- Verify the installation:
- Authenticate on first launch by running
claudein any directory. A browser window opens for OAuth login with your Claude Pro, Max, Team, or Enterprise subscription.
Alternative install methods include Homebrew (brew install --cask claude-code) and WinGet (winget install Anthropic.ClaudeCode), though these don't auto-update.
The old npm installation (npm install -g @anthropic-ai/claude-code) still works but is officially deprecated. If you installed via npm previously, run claude install to switch to the native version. I put off this migration for weeks and it took about 30 seconds.
One note for Windows users: both WSL and native PowerShell work for Claude Code. If you're already using Linux-based toolchains, WSL is the better choice since it supports full Bash tool sandboxing. Native Windows requires Git Bash.
Start your first Claude Code session by navigating to your project directory and running claude. Use /init to generate a starting CLAUDE.md, then explore your codebase before writing any code. Follow the Explore, Plan, Implement, Commit workflow. Always ask Claude to describe its approach and wait for your approval before it begins implementing changes.
A productive first session follows this pattern:
- Navigate to your project and start a session:
- **Run **
/initto bootstrap a CLAUDE.md. Claude scans your project structure, identifies file types, and generates a starting configuration. - Explore before coding. Ask Claude to explain your codebase, summarize the architecture, or identify patterns. This builds its understanding of your project.
- Use plan mode (Shift+Tab) to preview proposed changes before Claude implements them. This is your safety net for reviewing what Claude intends to do.
Anthropic's best practices documentation recommends an Explore, Plan, Implement, Commit workflow. Resist the urge to jump straight to "build me a feature." Let Claude understand your project first, propose a plan, and only then start implementing.
Commands worth knowing from day one:
/help-- shows all available commands/clear-- fresh conversation without losing CLAUDE.md context/compact-- compresses the conversation to free up context window space/config-- opens your settings
A CLAUDE.md file should include a one-paragraph project summary, your tech stack, build/test/lint commands, and key coding conventions, all within 60 to 80 lines. Use the WHY/WHAT/HOW framework: explain why the project exists, what it does, and how to work with it. Keep code style rules out of CLAUDE.md entirely and rely on linters and formatters instead.
CLAUDE.md is persistent memory. Claude reads it at the start of every session, so everything in this file shapes how Claude interacts with your code. Getting it right matters more than any other part of your claude code setup.
The WHY/WHAT/HOW framework (popularized by a HumanLayer blog post that earned 748 points on Hacker News) gives you a clear structure:
- WHY: What the project does and what problem it solves
- WHAT: Tech stack, dependencies, project structure
- HOW: Build, test, lint commands and verification steps
A template that covers the essentials:
Community consensus from developers who use Claude Code daily is to keep it under 60-80 lines. Beyond that, Claude starts deprioritizing instructions. Use deterministic tools (ESLint, Prettier) for code style enforcement rather than hoping Claude follows prose style rules consistently.
For larger projects, use @imports to reference external docs. A CLAUDE.md line like @docs/api-conventions.md tells Claude to load that file on demand. Imports chain up to 5 levels deep, so you get progressive disclosure without bloating your root file.
Two features that most setup guides skip completely.
.claude/rules/** directory** lets you create modular, topic-specific rules. Each .md file in this directory loads as project memory. You can scope rules to specific file paths using YAML frontmatter:
CLAUDE.local.md is for personal project overrides. It's automatically added to .gitignore, so your team shares a common CLAUDE.md while each developer keeps their own preferences (sandbox URLs, preferred test data, personal shortcuts) in CLAUDE.local.md.
Claude also maintains auto memory at ~/.claude/projects/<project>/memory/, saving project patterns, debugging insights, and your preferences across sessions. You don't need to configure this. It happens in the background.
For a deeper dive into CLAUDE.md configuration, see our CLAUDE.md guide.
Create custom skills by adding SKILL.md files to a .claude/skills/ directory in your project. Each file uses YAML frontmatter to declare its description, allowed tools, and execution behavior. The skills system replaces the older .claude/commands/ approach, though both still work. Beyond custom skills, the Claude Code plugin ecosystem offers over 1,300 community-built skills you can install.
Skills are how you teach Claude Code repeatable workflows. A skill is a directory containing a SKILL.md file with YAML frontmatter and markdown instructions. I use them for everything from running test suites to generating changelog entries.
A test-fixing skill looks like this:
Invoke it with /fix-tests src/features/auth/ and Claude runs the full workflow.
Claude loads skills progressively. It reads only the name and description at session start, then loads the full skill content when you invoke it or when Claude determines it's relevant. This keeps your context window lean.
The plugin ecosystem already has over 1,300 community-built skills across registries like Claude Code Plugins and Claude Plugins Directory. You'll find plugins for documentation lookup, browser automation, code intelligence, and linting. Browse what's available and install the ones that match your stack.
Configure MCP servers by running claude mcp add or by creating a .mcp.json file at your project root. Start with 2-3 servers that match your workflow. Keep project-scope servers in .mcp.json so teammates share the same tool configuration through version control.
Model Context Protocol (MCP) connects Claude Code to external tools and data sources. MCP servers let Claude query databases, pull up-to-date API docs, run browser tests, and call external APIs. They've changed my workflow more than any other Claude Code feature.
Three scopes control where MCP servers are available:
- Local (default): Private to you, stored in your user config
- Project (
.mcp.json): Shared with your team via git - User (
~/.claude/): Available across all your projects
Adding a server is one command:
For a new project, start with 2-3 servers that match your stack. Context7 gives Claude access to up-to-date API docs. Playwright handles browser automation. A database connector lets Claude query your schema directly.
Keep your total to 5-6 MCP servers per project. Each server consumes context window space, and loading too many dilutes Claude's attention.
Store credentials as environment variables in .mcp.json, not as raw strings. The file goes into version control, so API keys should never appear directly in it.
For a full walkthrough of MCP configuration, see our guide to Claude Code and MCP.
Start every Claude Code project with git initialized and permissions at their defaults. Use plan mode to review proposed changes before Claude implements them. Keep your CLAUDE.md concise and up to date after each major architectural decision. For production work, choose the stable release channel, which runs about a week behind the latest channel and skips builds with known regressions.
These are the habits I've seen make the biggest difference across dozens of projects:
- Initialize git first. Always have version control before your first Claude session. Git is your safety net for rolling back any change Claude makes.
- Keep permission defaults. Claude asks before reading, writing, or executing commands. Start with these prompts enabled and learn which operations you're comfortable approving.
- Use feature branches for AI-driven changes. Create a branch before asking Claude to refactor or generate significant code. Review the diff before merging.
- Treat CLAUDE.md as a living document. Update it after architectural decisions, dependency changes, or workflow shifts. A stale CLAUDE.md leads to stale suggestions.
- Pick a release channel. The
latestchannel (default) gives you new features immediately. Thestablechannel runs about one week behind and skips builds with known regressions. For production projects,stableis the safer choice. Configure it via/configor in your settings.json. - Start simple, then verify. Boris Cherny (engineering lead on Claude Code at Anthropic) uses a "surprisingly vanilla" setup. The tool works well out of the box. Add complexity only when you hit a real need, and review Claude's output the same way you'd review a pull request from a capable but fallible colleague.
- Choose your interface. The terminal gives you full power and all features. The VS Code extension adds inline suggestions and diff views for developers who prefer staying in their editor. JetBrains support is also available. Pick what fits your workflow.
See our full list of 50 Claude Code tips and best practices.
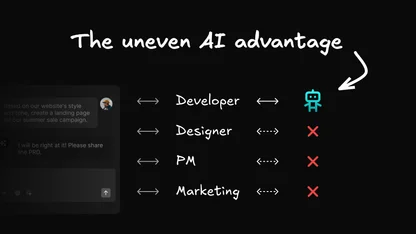
Share what git tracks, then bring in the people git can't reach. CLAUDE.md, .claude/skills/, and .mcp.json all live in the repo, so every developer who clones it inherits the same setup on their first claude session. That covers your engineering team. It doesn't cover the designers, PMs, and QA folks who never run Claude Code at all, and the setup work you just did doesn't extend to the parts of the workflow they own.
A designer who wants to propose a layout change still has to hand it off to engineering. A PM who wants to draft a feature update still has to spec it in a doc and wait. Your Claude Code project is ready for you to ship faster. The rest of your team still ships at pre-AI speed.
Builder 2.0 runs Claude Code in cloud containers that pick up your repo's CLAUDE.md, so the context you built (tech stack, commands, conventions) applies in every Builder session. Custom subagents and MCP servers live at the workspace level, so the team's connected tools are available to every teammate who joins a branch. A designer opens a branch in Builder's visual canvas and gets agent output generated against your real components. A PM prompts a copy change from Slack and the agent handling it has the same project context. A QA agent runs browser tests on every branch. Everyone works through a Claude Code agent that knows your project, regardless of whether they install the CLI.
Your setup is for your repo. Builder 2.0 is how every teammate inherits it.
Q: What is the difference between Claude and Claude Code?
A: Claude is Anthropic's conversational AI model, accessible through claude.ai and the API. Claude Code is a terminal-based coding agent that runs locally, reads your project files, and makes real changes to your codebase. Claude Code uses Claude as its underlying model but adds file access, command execution, and project context that the Claude Desktop chat interface doesn't have.
Q: Do I need Node.js to install Claude Code?
A: No. The native installer (curl on macOS/Linux, PowerShell on Windows) doesn't require Node.js. The older npm installation method required Node.js 18+ but is now deprecated. Use the native installer for a cleaner setup with fewer dependencies.
Q: How do I start a new project in Claude Code?
A: Create a project directory, initialize git, navigate into the folder, and run claude to start a session. On first launch, run /init to let Claude scan your project structure. Then create a CLAUDE.md file with your project summary, tech stack, and key commands. Claude reads this file at the start of every session.
Q: Can I use Claude Code in VS Code instead of the terminal?
A: Yes. Install the Claude Code extension from the VS Code marketplace. It provides inline suggestions, diff views, and an integrated terminal panel. The terminal version remains more full-featured, but the VS Code extension works well for developers who prefer staying in their editor.
Q: How do I troubleshoot Claude Code connection issues?
A: Verify your subscription is active and your credentials are valid by running claude --version and checking your account at claude.ai. If you're behind a corporate proxy, confirm outbound connections to Anthropic endpoints are allowed. Restarting the terminal and re-authenticating resolves most connection issues.
Installation takes two minutes. The real value of your Claude Code setup comes from what you configure after: a focused CLAUDE.md, the right MCP servers for your stack, and skills that encode your team's workflows. Auto memory and path-specific rules keep improving things in the background once you've done the initial work.
Start with the native installer and /init. Then write a CLAUDE.md under 60 lines using the WHY/WHAT/HOW framework. That single file will improve Claude's output more than anything else you configure.
Once your project is set up, explore how to use Claude Code for daily development workflows, or dig into customizing Claude Code for advanced configuration.
And when you want this setup to reach the people on your team who don't run Claude Code, start free on Builder.io →