Build a buttery scroll reveal like WAC with GSAP
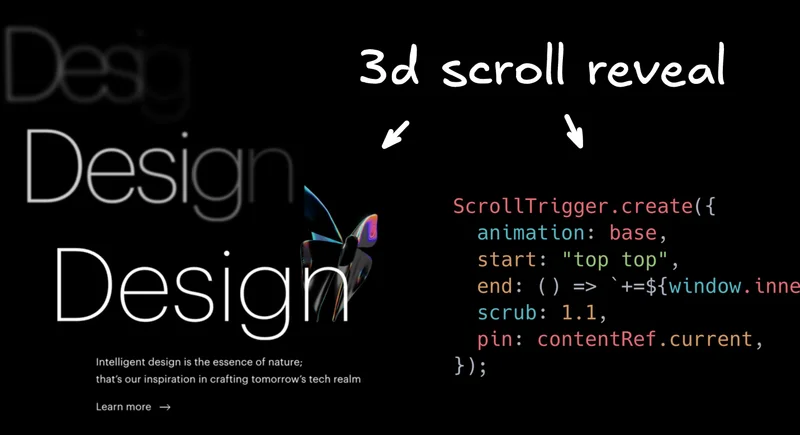
How does Web & Crafts make this awesome, buttery smooth transition where text and objects seem to come out of the abyss and it feels perfectly fluid?
Let me show you how I used a little AI to quickly reproduce the effect in Builder.io, how the code works with GSAP timelines, and how you can iterate visually. I will also show how I use Nano Banana and Veo 3 to make those 3D objects.
You can hand code your layout, but I am lazy. I use the Builder.io Chrome extension to copy layouts directly from the web.
Paste into Builder, iterate in the chat, and you have a starting point: a static section that scrolls like any other page content.
We are going to use the GSAP library to add scroll animations. GSAP gives precise timeline control that is easy to tweak in code.
The key move is to fade in each letter of the headline from blurry and transparent to clear and focused, with a stagger between letters.
Here is the prompt I used to initially recreate the effect:
Note that I’m not trying to do everything at once, just getting the basic fades in and I can refine with feedback.
In my case the initial results were good but some of the layout was off, so I can switch to Design Mode in Builder to do some precision fixes:
Once the text feels right, we can add the video. Drag in the butterfly video, place it where we want, and tell the agent to make the video fade in as the letters animate.
I used the prompt:
Builder generates UIs using your design system by default. In my case I wanted some additional adjustments, so you can just select the video layer in Design Mode and position it exactly.
Iterate until the timing and placement are what you want, and you can tell the Builder.io agent to repeat this same technique for the two sections below.
In Builder you can ask where the GSAP code lives. In my case, it is in design-showcase.tsx.
You can go to Code Mode and tweak any details you like, like the blur amounts and offsets. For fine tuning, this can be much faster than chasing prompts.
Let’s walk through the actual code powering these effects and explain the key parts.
GSAP is not a React library, it works on DOM nodes. So we’ll need to query the DOM for some of the important parts, like the videos, text, and buttons.
Importantly, if the user prefers reduced motion, we skip animations and set everything to visible.
We make letters blurred and offscreen, videos blurred and offset, body and CTA hidden. These are the starting frames for our transitions.
We have a small phases array at the top that we use for rendering in react and for our gsap timelines.
Now we can iterate over these and establish our from and to states for each part of the animation:
Timeline anchors explained:
- The fourth argument to fromTo is a number offset from the timeline beginning (e.g. a delay)
">"means start at the end of the previous animation.">-"means start at the previous end minus a small overlap, so sequences blend together.
Now we create a ScrollTrigger to bind our timeline to the scroll position of our container.
base collects each per-phase timeline. ScrollTrigger pins the content and scrubs the animation to scroll position.
end: () => "+=" + window.innerHeight * 6.6 sets a cinematic scroll length relative to the viewport.
Why this feels good
- Pinning keeps the content fixed while the world scrolls under it
- Scrub 1.1 adds a slight easing to the scroll linkage so motion feels natural.
Now, with the above techniques, you can recreate the animations from the WAC site. But if you want to add cool 3d holographic objects like they do, you’ll want to generate some of your own.
Here’s how to create your own
- In Gemini, go to
Toolsand selectCreate images. You need a reference, so upload a screenshot of a style you like (e.g. the holographic style of WAC). - Paste the screenshot into Gemini and first force the AI to describe the style in excruciating detail.
- Ask it to generate a new image, for example a floating cog in that same style. If colors are off, give feedback and iterate.
Then, we’ll need switch to Veo 3 to animate the image. Create a new chat, select Tools, then Create videos with Veo. Upload your reference image, and ask Veo to animate it (e.g. I used a cog, so I asked Veo to make it spin).
If the loop is not seamless, use a loop tool to (e.g. Sora) to align the first and last frames. Once you have a clean loop, download it and replace your placeholder video.
Then, just pop the new video in your code or Builder.io, and repeat to your hearts desire!