Use AI to Generate Pages From Your React Components
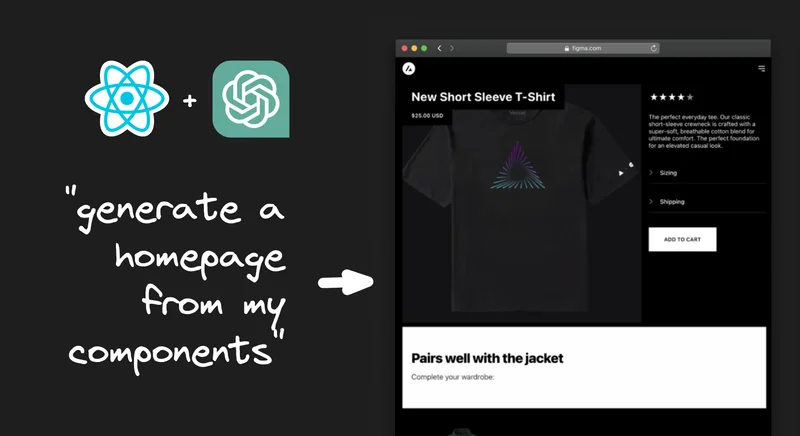
With our latest release, you can now use AI to generate new pages from your React components with a prompt.
For instance, asking for a homepage that features a couple products:
Generates a pretty nice result!
In this case, we forked NextJS Commerce and connected the components to Builder.io that are included there.
Let’s try another example, asking to generate a product page that features some basic product info and recommends a complementary jacket below:
That result is pretty nice!
This is all entirely connected to my localhost, so I can come in and make edits here too and see how the components change in real time.
For example, I can open up the Hero component source, and make edits with a live preview:
I can then pop back over and make changes to the props as well and see them update here visually.
For instance, typing in the title and subtitle props for our Hero, visually:
When I'm all done, I can grab this as code to move it to my codebase, using my components.
Which works for a React or Qwik, Vue, Svelte, Angular, and more:
Or you can connect Builder.io's Headless CMS API, so you can just click publish and test out these new pages on your live website without any code deploy needed:
Below, we'll cover setting this up to try yourself.
First, you will need to have a NextJS (or another supported framework) project.
Then, you ‘ll need to create a free Builder.io account. This only takes a couple minutes.
Afterward, we can add @buidler.io/react as a dependency to our project:
We then need to add a basic integration to allow Builder to dynamically render contents within our app.
For example, we can create a new file at pages/[...page].jsx to allow us to create new pages on our site. Copy and paste this code into it:
For more detail on integrating Builder.io, see our complete quickstart.
Next, we will need to register some components.
For example, if we have a Hero component like in the video above:
We can now register it for use in the Visual Editor:
This allows Builder to “see” your components, show a UI for the props you choose, and render them on demand.
For an explanation as to how this rendering works under the hood, see here.
Now, we need to import this component into our page we created above, so that the code to register the component runs and gets bundled.
Back in pages/[...page].jsx:
Note that you can also use dynamic() imports so this code is not eagerly bundled, as in Builder's Registering Custom Components documentation.
Now, repeat the process above for any components you want to use in the Visual Editor.
You can optionally use a prebuilt template like NextJS Commerce that gives you a lot of great components and a nice design out of the box, like I used for the videos above and these code examples.
Or, use our NextJS Commerce Example with Builder.io already integrated and above components registered.
Lastly, you’ll need to go to Builder and update your preview to connect to your local NextJS site. Go to the models tab, choose page, and enter http://localhost:3000 for the Preview URL and hit save at the top.
Now you can go back to the content page and hit + new to create new pages to experiment with the Visual Editor.
Now, once in the Visual Editor with your site integrated and some components registered, we can start generating compositions of our components with AI!
First, create or open a page. For instance, go to the content list and hit + new and you will be dropped into the Visual Editor.
Now open the Command Palette by hitting cmd+k on a Mac or ctrl+k on Windows or Linux, and search for “AI Generate Components”.
Now, try out some prompts, and find out how the AI composes your components!
You have two options now. You can grab the code we generated with the code, <>, button at the top.
Or just deploy these updates you made, and when you hit Publish at the top, your component compositions we be live on your site, immediately.
Like magic! Or in reality, it's just a dynamic rendering system that you might find useful.
Hi! I’m Steve, CEO of Builder.io.
I hope you enjoy these new AI features we are adding to the Builder.io platform. If you have thoughts on them, tweet at me!