Eliminating and Debugging Flaky Integration Tests
As the tech lead for the Builder SDKs, I am constantly maintaining a complex testing infrastructure to guarantee that our SDKs are battle-proof for all of our users.
In the process of doing so, I learnt a lot of important things on how to reduce the change of flaky integration tests, and how to debug them if you still encounter them.
I use Playwright to write my integration tests, but this advice should be helpful and applicable to many other testing tools out there.
If your integration tests are flaky, it could be because you're forgetting this really important check: that the element is visible. Let’s look at this basic test as an example:
UPDATE: someone kindly pointed out to me that for this particular example, I can use the toHaveCSS assertion to take care of this problem!
expect(buttonLocator).toHaveCSS('color', 'rgb(0,0,225')
I am leaving this tip as it might still be relevant for other computations done within page.evaluate.
Why is it important to check that an element is visible? Let me explain.
By default, an element doesn't have any computed styles until you attach it to the DOM. Once you do, the getComputedStyle() function is going to return an object populated with variables for every single style.
This also means that when the div is removed from the DOM, we go back to a computedStyle object with empty strings for every value! You can check for yourself in your browser’s console:

Why does this matter? Because it means that every time your server-side rendered app loads in the client, it's possible that the element that was there a few moments ago no longer exists and has been removed from the DOM (and replaced with another element during a hydration phase).
This is why, in general, you will want to make sure that the locator you're using actually gives you a visible element right before you run Playwright’s evaluateon it.
It’s very easy to forget to add an await before your expect calls. When you do, you can end up with race conditions that result in flaky tests that are really hard to debug.
Thankfully, there is a handy rule (no-floating-promises) in the typescript-eslint library that catches exactly that.
Here’s what its warning looks like if you forget an await:

I can’t tell you how many missing awaits it caught when I added it!
If you are actively debugging a flaky test, you need to:
- get the test to happen locally so you can debug it
- get details on what went wrong
- make sure it is no longer flaky
First, isolate your test by calling test.only(): this will ignore all other tests, and only run the one you choose:
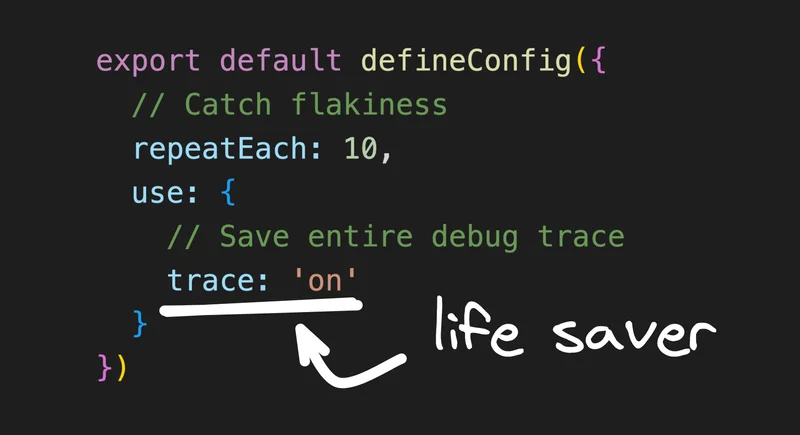
Second, update your playwright.config.ts to repeat the test multiple times, and keep logs of what happens:
Now, when you run your Playwright test, you should be able to get it to fail, and then see a link to your trace in the Playwright Report:

From there, you have access to a step-by-step replay of what happened in your test, along with screenshots, network requests, console logs, and much more!
You can see what the Trace report looks like in this video:
Hopefully, having access to all of this information can help you narrow down any flaky tests you may have.
Hope you enjoyed all of these tips. I’ll keep sharing as I learn more about all the useful features Playwright has, although I hope I never hit a flaky integration test again! If any of these tips helped you, reach out and let me know!